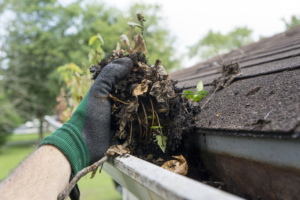
Teeth Whitening: What is Teeth Whitening?

Teeth Whitening Las Vegas is one of the most popular cosmetic dental treatments. It can lighten intrinsic (deep) and extrinsic (superficial) stains on teeth.

Generally, teeth will re-stain quickly after a whitening treatment, even if you avoid bright foods, coffee and red wine. However, with routine brushing and a touch-up whitening session once a year, you can maintain your white smile.

Teeth whitening is the process of lightening the color of teeth to make them look whiter. It is a common procedure and can be done at home or in a dental office. Many different whitening products are available, including whitening strips, whitening toothpaste, and whitening trays. Most of these products contain a type of bleaching agent, such as hydrogen peroxide or carbamide peroxide, which removes staining on the surface of the tooth.

Over-the-counter whitening products use lower strength bleaching agents than dentist-supervised at-home treatments, with the most common being 10% to 22% carbamide peroxide and 3% to 15% hydrogen peroxide. The amount of time the product is applied for also varies, with some requiring up to 60 minutes once or twice a day for two to four weeks. Whitening trays and whitening gels that are applied directly to the teeth have a lower duration and often require only 30 to 60 minutes daily.

Aside from the bleaching agent, other ingredients in whitening products may include mild abrasives and other chemicals to remove surface stains. Many whitening products also have LED lights to speed up the whitening process and enhance results.

Before beginning a whitening treatment, it is recommended to visit a dentist or dental hygienist for a checkup. This will help determine the cause of your tooth discoloration, whether it is a result of antibiotics, trauma to the gums or teeth, or dietary habits like drinking coffee and tea. These factors will impact how successful the whitening treatment will be.

During the whitening treatment, a protective barrier is put in place around the gums and cheeks to avoid irritation to these areas. The whitening agent is then applied to the teeth, usually after a light polishing with a pumice tool to remove any plaque buildup. A whitening shade chart is then used to determine the current tooth color and how many shades lighter it will be after the whitening treatment.

After the whitening treatment, it is important to continue to maintain good oral hygiene practices and avoid foods and drinks that can stain your teeth again. It is also recommended to re-treat your teeth regularly, especially if you are a smoker or drink a lot of coffee or tea.

Over-the-Counter (OTC) Teeth Whitening

Over-the-counter (OTC) whitening products are available as a quick fix at the drugstore to brighten your smile. These products work on extrinsic stains that discolor the surface of your teeth from food, drinks (like coffee and tea) and tobacco, poor dental hygiene, and aging. They don’t work on intrinsic stains, which are deep inside the tooth and may require other dental treatment like dental veneers or crowns.

OTC teeth whiteners come in the form of whitening toothpaste, rinses, gels and strips. These products typically contain bleaching agents such as hydrogen peroxide and carbamide peroxide that remove stains from the enamel of your teeth. They may also contain abrasive particles to scrub away superficial stains and a color-changing agent to lighten your teeth’s shade.

The majority of OTC whitening products take 16 days or more to produce the same results as a whitening procedure done in a dentist’s office. In addition, OTC whitening treatments can cause tooth sensitivity for some patients, which makes them less than ideal to use on an ongoing basis.

When choosing OTC whitening products, read the label to find out what ingredients the product contains and how to use it properly. Most products will have directions on how long to leave the product on your teeth and what not to do with it, such as brushing or rinsing immediately afterward. If you don’t follow the instructions, it could lead to sore gums or even thinning your teeth.

In addition to using whitening products with care, it’s important to avoid foods and beverages that stain your teeth. It’s hard to keep your teeth white by regularly consuming darkly colored foods such as berries, wine, coffee and black tea. It’s also best to brush and rinse your teeth immediately after eating or drinking to prevent stains from developing.

If you’re looking for a more effective way to whiten your smile, ask your dentist at O’Kane & Monssen Family Dentistry about professional teeth whitening options. We’ll examine your mouth to ensure you don’t have any oral health issues that might affect the whitening process, and we can provide customized whitening trays and a safe whitening gel that is stronger than anything you’d get over-the-counter.

In-Office Teeth Whitening

The demand for whiter smiles has led to the development of a variety of teeth bleaching products. These include both home-based whitening toothpastes, strips and gels and professional in-office whitening with a higher concentration of bleaching agents.

The office based systems usually contain hydrogen peroxide and are used under a dentist’s supervision. The higher concentration of bleaching agent is intended to achieve results that are more dramatic than those achieved with OTC whitening products. These results may last longer, although the color will eventually fade over time and will need to be repeated.

Before beginning the whitening treatment, the dentist will likely clean your teeth to remove plaque and tartar. This will also help to prevent the irritation that is often associated with the application of whitening gels. Next, a cheek retractor will be placed in the mouth to expose the area that is being treated. A small amount of bleaching gel will then be applied to the teeth and will be allowed to set for a short period of time. The whitening process is usually completed within one 30- to 60-minute visit. The dentist will then evaluate the appearance of the teeth and may recommend additional treatments or a tray delivery system for continued whitening at home.

Many in-office whitening procedures use a light source to activate the whitening gel. This light is typically in the blue spectrum, and it is designed to accelerate the oxidation of hydrogen peroxide molecules on the surface of the tooth. However, a recent systematic review of the evidence did not find any additional benefit to whitening using light-activated whitening systems.

The stains that are most effectively removed by bleaching are those that are on the surface of the teeth and are caused by foods, beverages, or tobacco. Over-use of certain medications and antibiotics may also contribute to the formation of surface stains on teeth. Generally, these stains are not as difficult to eliminate as those that are caused by enamel damage or decay. Consequently, the most effective method of teeth whitening is by visiting your dentist for a professional whitening procedure.

Take-Home Teeth Whitening

If an individual doesn’t have the time for in-office whitening or just wants to save some money, a take-home teeth whitening kit may be an ideal option. Depending on the brand, these kits can include a set of custom trays and a whitening gel for use at home. The trays are snugly fitted to the patient’s mouth, which ensures even contact with all surfaces of each tooth for consistent results. Patients are encouraged to wear the whitening gel for about an hour daily for 10-14 days in a row. Some blends are safe to sleep in, which can be a convenient way for patients to keep their whitening schedule.

In addition to the whitening gel, the kit will usually also include instructions for how to properly apply it. For example, patients should not overfill the trays, which can cause gum irritation during treatment. Additionally, the whitening tray should be rinsed thoroughly after each application to remove any remaining whitening gel and to prevent sensitivity. Lastly, the dentist may recommend that a patient brush with a toothpaste designed to protect enamel and reduce sensitivity after each whitening session.

While whitening at home is very convenient, it can take more time and effort than in-office treatments. However, with a little commitment, the results can be just as dramatic and long-lasting.

Teeth Whitening at home is ideal for those who have a busy lifestyle but want a brighter smile. The whitening results are not as immediate as in-office whitening, but they keep improving over the weeks following treatment and can last for months if the whitening is maintained on a regular basis.

It is important for patients to remember that a whiter smile is not permanent, and the stains will eventually reappear. To maintain the whitening effects, it is crucial to minimize contact with staining substances, such as coffee, tea, red wine, and tobacco. It is also important to keep up with brushing and flossing, to use a whitening toothpaste, and to schedule regular dental checkups to remove any surface stains. Finally, a touch-up whitening gel can be used periodically to restore the dazzling whiteness of your smile.

Ceiling Painter Tips

A fresh coat of paint on a ceiling can completely change the feel of a room. Here are some tips to help you make your next project a success.

Work in sections. It’s much easier to cut in a section, then roll it than to try and cover the brush marks with your roller. Contact Ceiling Painter Wilmington now!

Whether you are a professional painter or doing a DIY project at home, it is important to prepare the ceiling before applying any new coatings. This includes removing any furniture or covering it with plastic sheets, sanding the ceiling, and cleaning any light fixtures or fans. This ensures that the new paint will adhere properly and last a long time.

It is also important to choose a ceiling paint that is designed specifically for the job. This type of paint is often formulated to minimize lap marks and spatter and provide better coverage over the rough surface of the ceiling.

A quality primer will also help. It will help the ceiling bond to the surface, hide any stains, and prevent tannin bleed-through. A stain-blocking primer is essential for any ceiling, especially in areas that may experience heavy staining from water, smoke, or pet food spills. For a smooth surface, the ceiling should be lightly sanded before priming and painting.

Once the primer has been applied and dried, you can begin the actual painting. If you are using a roller, it is best to work in sections of about 4×4 feet at a time. This helps you keep track of where you have painted and avoids the need to touch up any areas that aren’t fully covered with fresh paint.

Brushing is another common technique for ceiling painting. A good quality synthetic or natural bristle brush will allow you to apply a thin coat of paint and create a smooth, even finish. When brushing the ceiling, be sure to work in small sections, overlapping each stroke slightly to blend the edges. It is also a good idea to wear a baseball cap and safety glasses, as painting the ceiling showers you with a fine mist that can leave your skin with “pain freckles” if not adequately protected.

If you are painting a ceiling with an oil-based paint, you will need to wait until the primer is dry before sanding. Then, you can start the sanding process with your electric sander or hand-held sander. Be sure to clean the sander and your brush with warm soapy water (for water-based paints) or solvent (for oil-based paints).

Painting

A fresh coat of paint on a ceiling is an easy and inexpensive way to transform the overall look and feel of a room. Unlike wall painting, however, ceilings must be treated with special care, since they are often exposed to more environmental factors than other surfaces and may require extra prep work. This includes a thorough cleaning to remove dust, dirt and other debris, as well as a spot repair or replacement of damaged areas.

One of the most important things to remember when painting a ceiling is that it’s best to use a sheen that is specifically designed for ceilings. This is because the light that hits the ceiling bounces off it differently than other surfaces, highlighting any imperfections on the surface. Fortunately, most paint stores now offer specialized ceiling paint with a flat sheen that’s made to hide these imperfections and provide a clean, uniform appearance.

Before you begin painting, it’s a good idea to cover any furniture or other fixtures with plastic sheets to prevent any accidental drips or splatters. Also, because you’ll likely be working from a ladder, it’s important to make sure it’s sturdy and that you or whoever will be painting is comfortable climbing up and down for long periods of time.

Once you’ve prepared the ceiling and protected your furnishings, it’s time to start painting! It’s important to always work slowly and carefully to avoid any mistakes. A good ceiling painter will also use a roller on an extension pole, which is a lot safer than using a traditional brush and makes it much easier to reach the higher parts of the room. It’s a good idea to choose a roller with a 3/4″ nap, which is ideal for textured ceilings and will help it to get into all of the hills and valleys to ensure even coverage.

Once you’ve cut in all of the edges with your brush, it’s time to switch to the roller and start covering the rest of the room. It’s typically best to do this in small sections, so you can be certain that all of the tape and brush marks have been covered.

Finishing

A fresh coat of paint can do wonders for a ceiling. Not only does it add to the room’s ambiance, but it can also help conceal discoloration caused by structural shifts or moisture damage. Our painting process is meticulous and focuses on achieving a uniform appearance that enhances the room’s natural light.

To ensure a beautiful finish, the first step in our painting process is priming. Our primers are formulated for specific surfaces and purposes. For example, for watermarks and stains, we recommend using KILZ Restoration Primer, which blocks heavy stains such as tannin bleeding and can hide discoloration from smoke or pet urine. In addition, our Mold & Mildew Primer works well for damp spaces.

The next step in our painting process is sanding. This prepares the surface for paint, removes imperfections and sanding marks and creates a smooth surface. It’s essential to use a fine-grit sandpaper to avoid over-sanding, which can cause ridges and unevenness in the finish.

Before applying the first coat of paint, it’s important to mix the product thoroughly. We recommend using a paint stirrer to ensure that all the pigments are evenly distributed. This ensures a consistent color and helps prevent drips. When painting ceilings, it’s best to work on small areas at a time and to avoid overworking the paint. Overworking the paint can cause it to dry unevenly and may even pull the existing surface paint away.

Depending on the desired effect, we offer a variety of ceiling paint finishes. Flat and matte finishes are popular choices for ceilings, as they provide a subtle look that’s easy to maintain. We also offer textured ceiling paints for those who want to add depth and dimension to the space.

Once the painting is complete, it’s important to inspect the finished work carefully for any touch-ups or imperfections. Using natural and artificial lighting will allow you to see any roller marks or uneven coverage so that you can address them before the paint dries. Once any necessary touch-ups are completed, the furniture and decorations can be returned to their original locations, and you can enjoy your new ceiling!

Cleaning

A painter’s cleaning process begins with a thorough inspection of the ceiling for damage, stains, mold, mildew and other issues that may require special treatment. It is also important to check for loose plaster and caulking. Once all the surface areas are clean and dry, the ceiling painter will apply a stain blocker or primer to prevent the discoloration from bleeding through the new coat of paint.

Next, the ceiling is washed with water and a mild detergent. This process removes dirt and debris that is difficult to remove with dry methods. After the washing, the ceiling is rubbed down with a soft cloth to remove any remaining residue and to prepare it for painting. Then, the ceiling is dried thoroughly to prevent smears and streaking.

While the drying process is going on, the ceiling painter should make sure that the room is properly ventilated to avoid odors and fumes. If the room is too stuffy, it may be necessary to open windows and use fans to help the air circulate. This is especially important in rooms that are being painted with oil-based paints.

Once the paint is dry, the ceiling painter should make sure that all traces of tape are removed and any masking areas are cleaned. This includes the area under any light fixtures and around electrical outlets and switches. It is also a good idea to clean up any drips or spills and to clean up any plastic covers that were used to protect furniture or other objects in the room.

In industrial and commercial settings, ceilings can accumulate a lot of foreign object debris, or FOD, from the ongoing operations in the building below. This material can be extremely hazardous, particularly in warehouses where there are chemicals and materials stored on the ceilings. The cleaning process for industrial and commercial ceilings involves a careful cleaning, disinfecting and dusting process to prevent contamination that can cause spontaneous combustion. A clean ceiling can provide safety for employees and customers alike, as well as preventing the accumulation of dangerous materials from being dropped down into equipment or stored products below.

Pipefitter

Plumbers In Cleveland Ohio are responsible for the water systems that provide us with hot and cold water, and that also carry sewage and drainage. Without these plumbing systems, life would be difficult.

They are front-line health workers who ensure that we have clean water for showers and baths, cooking and cleaning. They often work in awkward positions and with dangerous materials.

Plumbers install piping and fixtures that facilitate water, gas, and waste disposal in residential and commercial settings. This includes toilets, faucets, sinks, showers, bathtubs, dishwashers, and water heaters. Plumbers also repair and replace these components when they wear out or are damaged. In addition, they may work on more complex plumbing systems in industrial and commercial buildings that serve multiple occupants. Such installations often require collaborating with engineers and architects to ensure the proper integration of plumbing with other building infrastructure.

On construction sites, plumbers set up piping and fixtures according to blueprints and building plans. This can involve laying out piping, connecting appliances and fixtures, and testing for leaks and other problems. Plumbers also may be responsible for rerouting existing piping when a renovation or expansion project necessitates it.

Some plumbers specialize in certain types of installations, such as gas line installation. In this role, they may set up and test propane and natural gas appliances and install new ones as needed. They may also install and repair backflow prevention devices and septic system components.

Other plumbers focus on maintenance and repairs. This can include unclogging drains, repairing toilets and faucets, and replacing worn out parts like valves and washers. Plumbers typically use hand tools and power tools to perform their duties. They may need to assemble and solder pipes, measure and cut them to size, and use heat shrink tubes to join sections of pipe together. In some cases, they may need to use a specialized tool called a snake to unclog drains.

Because they work with a wide range of people, plumbers must have strong customer service skills. They must be able to explain complicated issues in easy-to-understand terms and answer questions about pricing and the process of completing a job. They must also be able to work well with contractors and other tradespeople, as they may need to coordinate with them to install or repair plumbing in a home or business. Finally, plumbers often must be available on-call to address emergency situations, which can occur at any time.

Maintenance

As plumbers work with dangerous chemicals and equipment, they need to follow strict safety protocols. This can include wearing protective gear, using specific tools and following proper disposal methods for hazardous materials. They also need to take regular breaks and stay hydrated to prevent fatigue and overwork.

Plumbers are also responsible for ensuring that they’re up-to-date on the latest plumbing techniques and equipment. This means that they may need to spend a significant amount of time training or attending workshops and conferences. While this can be an inconvenience, it’s often necessary for the smooth running of their business and to keep customers satisfied.

Maintenance services offered by plumbers can range from routine cleaning and inspection to repairs of pipes and fixtures. They can also help with the installation of new appliances like water heaters and dishwashers. In some cases, plumbers may need to relocate existing pipes and systems to accommodate upgrades or updates.

Another important function of plumbers is providing emergency services. They’re on-call 24/7 to respond to plumbing emergencies, such as burst pipes and clogged drains. This can be a stressful and unpredictable job, but it’s one that’s critical for the health and safety of the public.

Plumbing is a regulated trade, meaning that it’s highly competitive. As such, many plumbers begin their career by doing an apprenticeship, which typically lasts four to five years and includes classroom instruction and on-the-job training. Once they’ve completed their apprenticeship, they can then apply for a license to practice independently.

There are several advantages to becoming a plumber, including the fact that it’s a highly respected and in-demand profession. In addition, plumbers can expect to make a good salary, especially if they’re licensed and have years of experience.

There are also some disadvantages to being a plumber, including the fact that it’s not suitable for those who have a fear of germs or don’t like working with their hands. Additionally, plumbers are often on-call at unscheduled times, which can interfere with their personal lives. Finally, plumbing can be physically demanding and require the use of heavy machinery.

Repair

Plumbing repair services are often needed to fix issues that arise in homes and commercial spaces. While some problems have simple solutions that homeowners can undertake themselves, others are more serious and require a professional to inspect and solve. Some common repairs that plumbers do include fixing clogged drains, leaking pipes and toilets, and fixing water heaters. Other types of plumbing repair work may include installing fixtures, such as bathtubs, showers, sinks, toilets, and faucets, repairing or replacing sewer lines, and constructing new home plumbing for renovations.

Most homeowners encounter a clogged drain at some point, and while there are many DIY solutions available, it’s usually best to call in a professional plumber for more severe clogs or those that occur near water heaters, garbage disposals, or washing machines. These professionals use specialized tools to clear out the blockage, and they also know how to clean and maintain these appliances to ensure that they last as long as possible.

A plumber’s job can be dangerous, so it’s important to trust this trade professional to get the job done safely and correctly. Plumbing repairs can be costly, so it’s important to have an accurate estimate before hiring a plumber for the job. This will help prevent surprise fees or unanticipated expenses down the road.

Leaking pipes are a huge problem for homeowners, and they can cause extensive water damage in a short amount of time. These leaks can be caused by a number of factors, including age and wear and tear, frozen pipes, or just general corrosion. Regardless of the cause, these leaks are best fixed by a plumber, and they can usually be repaired with a simple patching technique.

Plumbers can repair or replace sewer lines and install new fixtures, such as toilets, showers, faucets, sinks, and garbage disposals. These professionals are skilled at reading blueprints and understanding the construction process to ensure that the plumbing is installed correctly and meets local codes. They also have the knowledge and equipment to deal with any challenges that come up during the project, such as dealing with unexpected materials or working around structural elements.

Troubleshooting

One of the most important services offered by plumbers is troubleshooting. This is a step-by-step process that can help find the source of problems and repair them. It starts with defining the problem clearly and understanding its symptoms. It also includes identifying possible causes, including user error or machine failure. It concludes with restoring the product or process to its normal state.

When something goes wrong with your plumbing system, it can be a major inconvenience. But with the right plumber, you can rest assured that your issues will be resolved quickly and effectively. This will save you time and money in the long run, so it’s worth spending a little extra to get things fixed as soon as possible.

Some of the most common problems that plumbers deal with are drain clogs and leaky pipes. These are usually due to worn-out seals or broken pipes. Plumbers can use a variety of tools to diagnose and repair these issues. For example, they might use a camera to inspect the inside of your drainpipes and identify the cause of the clog. They can also unclog your drains and replace old, damaged pipes with new ones.

Another service that plumbers offer is water heater installation and maintenance. This involves replacing or repairing the water heater tank, piping, and fittings. Plumbers can also install water heaters that are more energy-efficient than older models. They can even connect your heater to a solar power system to reduce your energy costs.

A good plumber can also help with sewage systems. These are the pipes that carry away waste from toilets, sinks, and bathtubs. If they stop working, it can lead to a lot of health and safety issues for your family. Plumbers can use special cameras to check the condition of your sewage system and fix any problems.

Some plumbing companies even provide emergency services. These are available round the clock and can be very helpful when you need help urgently. For instance, if your sewage system is backed up and you’re experiencing severe backflow, it’s best to call an emergency plumber immediately.

The Benefits of Insulation

Insulation Perth keeps you warm and reduces energy consumption by slowing heat transfer methods such as conduction, convection and radiation. This allows your heating and cooling systems to work less hard & saves you money!

Materials such as plastic foam and wool trap air, reducing the transfer of thermal energy. This is known as insulation’s R-value. Metals, on the other hand, conduct thermal energy readily.

Insulation keeps a home’s interior at the desired temperature, minimizing energy costs and maintaining a comfortable environment. It does this by slowing heat transfer, making the air conditioning system work less efficiently.

The amount of energy saved by insulation depends on where you live. Homeowners in colder climates like Alaska, Montana and North Dakota see the greatest benefits (around 18%), but even homeowners in Florida and Texas should consider insulating their homes to keep their electric bills lower.

Homes that are poorly insulated can waste 15% of their energy. This is because air leaks in and out through cracks, holes and gaps – which not only costs money but also causes wear and tear on heating systems and air conditioners. However, properly sealing and insulating the home can significantly reduce these costs.

Insulation creates a barrier that prevents heat from entering the home during summer, keeping your living spaces cool without the need for air conditioning. It also helps to limit the amount of heat from coming into the home during winter, decreasing the demand on your heater.

There are many different kinds of insulation, which differ in cost and performance. Generally speaking, the higher the R-value the better the insulating properties. It’s important to consult with a professional installer to ensure the correct level of insulation for your home.

Insulation can be added to most parts of the house, including the walls and the roof space. It’s particularly useful in preventing heat loss from the ceiling during the winter, as well as slowing down the rate at which hot water flows through the pipes in your home. It’s worth noting that insulating your hot water cylinder and/or pipe can save around PS20 per year, so it’s definitely worth considering this option too.

Increases Comfort

Your home is your retreat, and you deserve to relax in comfort. Insulation is one of the best investments you can make to ensure that your home is as comfortable as possible. Insulation reduces drafts and makes it easier to control internal temperatures. It also minimizes the transmission of noise, so you and your family can sleep soundly.

Whether you are looking to increase your home’s comfort or save on energy bills, the right type and amount of insulation is crucial. A professional insulation technician can help you select the right products for your needs. They will take into account your home’s climate, age, and size to determine the appropriate R-value and type of insulation. They will also provide tips for sealing air leaks and ensuring optimal heat flow.

A well-insulated home will keep more heat inside during the winter, decreasing the number of times the heater has to turn on. This results in a lower heating bill and money saved. Insulation will also keep the summer heat outside for longer, reducing the need to run the air conditioner as frequently. This helps your AC system to stay more efficient, and prolongs the life of the mechanical parts in your unit.

Uncomfortable indoor temperatures are a sign that your insulation is aging or not performing as expected. High energy bills are another sign that your home is under-insulated. Investing in insulation will ensure your home is cozy, energy-efficient, and healthy for years to come. This investment will pay for itself in lower utility bills and increased resale value. Insulation can be installed in the attic, basement, walls, and crawlspace. This means that all areas of your home can benefit from the comfort and cost-saving benefits that it offers.

Reduces Noise

Insulation is not only effective at slowing the transfer of heat from one area to another, but it also reduces the transmission of sound. This can be an important factor in a comfortable living environment, especially when you live near a busy road or other noisy areas. Insulation helps to block out those sounds so that you can focus on your own tasks and enjoy the comfort of a quiet sanctuary from outside noises.

The type of insulation you choose can make a difference in how much noise is reduced. Some types of insulation absorb sound energy, while others serve to simply block it. It’s important to consider these differences when selecting the type of insulation you need for your home or office.

Using spray foam insulation can help you keep in the sounds that you want and block out the ones that you don’t. This is because of the way it expands to fill all of the spaces between studs and joists, unlike traditional fiberglass insulation.

Many outside noises can penetrate a home or office, including traffic, voices, construction equipment, and even airplanes. Insulation can significantly reduce these and other noises to create a more peaceful space for living and working.

The most important consideration when it comes to soundproofing is making sure that there are no gaps or openings in the walls and that they are sealed properly before installing the insulation. This will prevent flanking sound from passing through the building and causing additional problems. In addition, using a solid door can further reduce the passage of sound within a room. This is particularly important when the space is used for living or sleeping.

Prevents Insects

Insulation prevents pest infestations by blocking and sealing areas where air can migrate in and out of the house. This also helps control humidity, which is a key factor in keeping pests away. Pests and bugs are attracted to damp, humid environments, which can cause significant damage to the home. Insulation is a powerful way to help keep pests out of the home, while also helping to save money on energy bills.

Old insulation can be a breeding ground for insects like cockroaches, which can then spread diseases and germs throughout the home. New insulation with pest-repellent properties is designed to stop pests before they can cause harm, while also improving a home’s energy efficiency.

Insects that invade a home can cause expensive structural damage, and may even present a safety hazard, especially when chewing through electrical wires. Insects can also leave behind allergens, waste and disease in contaminated insulation material, making it important to have this removed and replaced as soon as possible after an infestation.

Spray foam insulation is the only type of insulation that can create a completely seamless air-tight seal. This is the best solution for preventing a wide range of pests, including ants, roaches and stink bugs. Other types of insulation, such as cellulose or fiberglass, can still provide effective protection from pests, by using an additional air-sealing product to close off any entrance points.

Insulation that has been specially treated with boric acid is another great option for repelling common insect pests. The boric acid is applied to the surface of the insulation, and when an insect brushes against it while crawling through a wall or attic, the bug will ingest the boric acid, which will kill it. This kind of insulation is not only better at protecting against pests than other forms of insulation, but it is also less likely to degrade over time.

Prevents Fires

Insulation prevents fires from starting in the first place by slowing down the transfer of heat. It does this by reflecting thermal radiation and by reducing the conduction and convection of heat through solids. It also prevents flames from spreading from room to room by separating walls, floors, ceilings and other combustible materials from each other.

To form a fire, three things must be present: heat, oxygen and fuel. Insulation can help to reduce the presence of fuel by preventing hot wires from contacting each other, which could otherwise start a fire. It can also limit the oxygen available for combustion by blocking air from reaching heating and cooling systems.

It is important to be careful about the type of insulation you choose as some can burn. Fiberglass is naturally fireproof, but it is a good idea to be especially cautious with batts that have paper or foil backings, as well as cellulose. These materials need to be treated with flame retardants or other fire-retardant chemicals. It is also a good idea to avoid insulation that has any type of adhesive on its backing, as these can also burn or become toxic in a fire.

While flammable insulation will burn, it will not release harmful decomposition products as quickly as some other traditional building materials do. This can provide a valuable buffer that slows the spread of fire and gives firefighters or homeowners time to escape. Studies show that it takes more than 20 minutes after an insulated wall has been exposed to fire for the insulation to begin to generate these harmful compounds. This delay in the production of toxic products can be further reduced by using a fire barrier such as plywood over the insulation.

What Does a General Contractor Do?

General Contractors Lexington KY is responsible for taking a home improvement project from design to construction. They coordinate and oversee the entire process, including hiring subcontractors to complete specific tasks.

Great contractors are able to create a scope of work that is feasible within their budget and schedule. They also have a keen eye for quality and will address any issues promptly.

Project planning is a key part of project management that includes identifying project goals and objectives, setting up a timeline, and assigning tasks. It also involves establishing budgets and resources for different phases of the project. Project planning involves analyzing risks and putting in place plans to mitigate them. It is essential that project planning is carried out in a way that addresses all aspects of the construction process, including safety and quality control.

A general contractor’s job is to make a client’s vision a reality. This is true whether they are working on a new construction project or remodeling an existing one. This means that they must be able to listen well and take note of what their clients have to say about the building, its style, and their overall preferences. This allows them to provide their clients with the best services possible.

In addition to ensuring that the final project meets all of the client’s expectations, it is the responsibility of a general contractor to keep the project on schedule and within budget. This is an important task because the longer a project extends past its original completion date, the more it can negatively impact all parties involved. The GC can help the project stay on track by breaking down the entire scope of work into manageable components and determining how long each will take to complete. They will then create a detailed project schedule that takes into account all of the dependencies and resource requirements to ensure that the project is completed on time.

The next step in project planning is defining the team’s roles and responsibilities. This is done by creating a project organization chart that clearly outlines who is responsible for each task. The GC will then decide on a project scheduling methodology (like the Critical Path Method or Program Evaluation and Review Technique) and identify all of the tasks that are required to meet the project’s deadlines. This helps them identify any tasks that can be delayed without affecting the project’s turnover date and prioritize those activities.

Vendor Management

Managing the supply side of a business is a critical task that requires a data-driven, robust vendor management system to optimise costs and ensure service delivery. Large businesses often have hundreds of vendors in a range of categories, from IT services to office supplies to logistics providers. To reduce operational risk and maximise ROI, companies need a clear policy that sets the criteria for selecting and nurturing vendor relationships.

A GC oversees a team of professionals who manage the intricacies of vendor sourcing, estimates, capacities, quality work, turnaround times and invoicing. This is important because it enables the project to stay on budget and ensures that the necessary materials are in place at all times.

Another aspect of vendor management is to ensure that the project’s communication infrastructure is robust. This is crucial because the GC needs to coordinate various team members and contractors across multiple sites. Without a strong communication network, the project will likely experience delays and unnecessary costs.

Finally, a GC must be familiar with the payment chain process — the way that money moves from the property owner down through tiers of subcontractors and suppliers. Having visibility into these processes can help a GC spot issues early on and address them promptly. It can also be beneficial for a GC to use tools that streamline payment forms and processing so they don’t have to manually manage these processes.

Managing vendors begins with the initial onboarding process, which includes gathering documentation and setting up a vendor as an approved supplier. Then comes contract management, which involves reviewing and negotiating contracts. Lastly, there is the monitoring and performance side of vendor management, which involves tracking and measuring the performance of all vendors.

The key to success in a career as a general contractor is having the right skills and expertise. You need to understand the latest construction trends and best practices, as well as be able to communicate clearly with both clients and subcontractors. It’s also important to have a solid understanding of the different types of contracts and their specific requirements. You should also keep up with licensing requirements in your area. Some areas require continuing education classes to maintain your license.

Communication

Communication is essential to a general contractor’s job. GCs must be able to effectively communicate with homeowners, employees and subcontractors. Effective communication maintains transparency which strengthens trust, manages expectations, reduces conflict and resolves issues faster. The GC must also be able to convey detailed information with accuracy, as the project progresses and changes are made.

Typically, there is a chain of command for construction communication established in the contract documents. This includes the architect, the superintendent and the general contractor. The GC must make sure that any direct communication that does not go through this channel gets proper authorization and is recorded in the project file.

For large construction projects, the GC oversees vendor management to handle the intricacies of sourcing vendors for materials and building components. This involves assessing estimates, capacities, quality of work and turnaround times. This process also entails establishing relationships with vendors, and ensuring that all aspects of the supply chain are streamlined.

The GC must also ensure that the project site is safe for workers and residents, as well as visitors and neighbors. This includes securing all required permits and keeping up with the latest building codes. The GC must also be able identify safety hazards and quickly correct them before they lead to an accident.

As the project progresses, the GC monitors construction to make sure that it’s on schedule. If there are unexpected delays or setbacks, they must be able to adjust the project schedule to keep the entire team on track.

If you’re thinking of completing a home construction or renovation, a GC can make all the difference in steering the project toward its goals and staying within your budget. Their experience, expertise and ability to trouble-shoot can make your dream come true while minimizing any pitfalls along the way.

While many general contractors gain their experience through on-the-job training, there are also several educational programs designed to help newcomers learn about the field and develop the skills necessary for success. These programs often include hands-on field experience and offer practical knowledge that can help you advance in the industry.

Safety

A strong contractor safety program is the key to ensuring a safe construction site. General contractors oversee numerous tasks on a project, so they must have a system in place to prevent accidents and injuries that could slow down progress. This includes vetting contractors before they’re hired, inspecting the worksite regularly and communicating expectations clearly to all parties.

Contractors often take on hazardous duties like operating machinery, lifting heavy objects and performing manual labor. In the United States, nearly 6.5 million people work in construction on any given day. Due to the risky nature of their job, construction workers have one of the highest rates of occupational injury and illness in all industries. To reduce these risks, it’s important for general contractors to set clear safety procedures and provide training to their team members.

On multi-employer worksites, a general contractor may be considered the “controlling employer” if it exercises sufficient control over the work being performed at the worksite to require subcontractors to comply with occupational health and safety standards and abate hazards. On occasion, OSHA cites GCs for violations committed by their subcontractors, even though the GC’s employees are not exposed to the specific hazard or posed by the subcontractor’s failure to comply.

Despite the fact that OSHA has established that the GC’s duty to exercise reasonable care on the worksite is less than the primary employer’s duty to protect its own employees, there are still many reasons why a GC should make its safety requirements clear to its contractors. Having a comprehensive contractor safety program can mitigate the risk of worker injuries, protect corporate reputation and support compliance with government regulations.

In addition to vetting contract companies and requiring insurance levels that meet ND’s requirements, a GC should include an orientation for all contractors before they begin working on campus. This can include a safety tour, a discussion of the hazards that they will encounter on Campus and how to respond to them and a brief safety tailgate meeting covering topics relevant to the specific work being performed.

It’s also important for a GC to keep accurate records of inspections, training and incidents on projects. This will allow them to identify patterns and trends and make improvements if necessary. For example, a record of an accident can help a GC determine whether or not it was caused by a violation that should have been corrected.